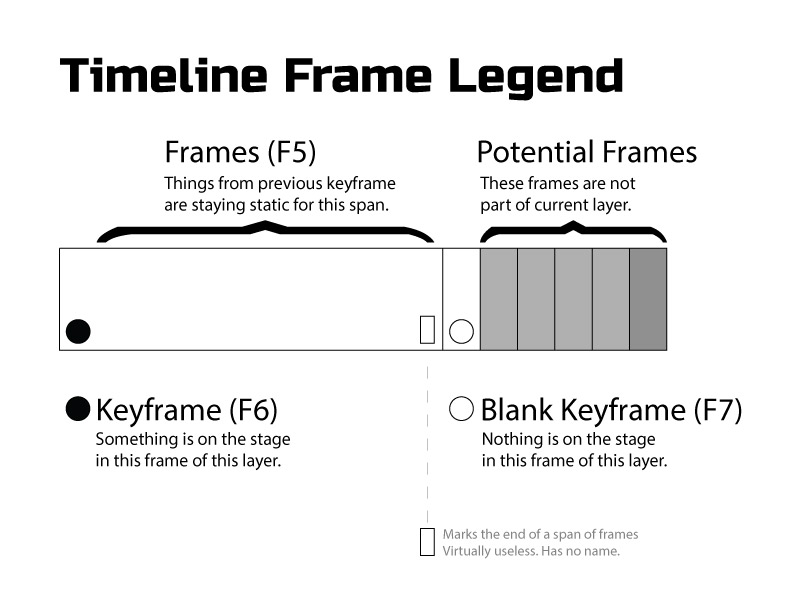
Have you ever opened up an Animate file and or watched a tutorial and been totally perplexed by the visual appearance of the timeline? There’s a bunch of little black circles, stroked circles and rectangles of different shades of grey. I’m here to help decipher it all.
The video below is the 5th from Animate CC for Everyone and although it isn’t the prettiest, its probably one of the most important in the whole course (if you want to see the first 4 videos, just sign up to my newsletter for instant access).
I always tell people that I could provide them step-by-step instructions on replacing the timing belt on an ’85 Camry that they could follow flawlessly, but it wouldn’t make them a mechanic. In order to be a mechanic you need to know the fundamentals. In order to become an animator, you also need to know the fundamentals of the Animate CC timeline; not just follow my orders.
This lesson is all about understanding how to read the timeline and understand the appearance and roles of the various frames. By the end of this lesson you will have a much better understanding of everything in the Timeline Frame Legend and will be fully equipped to take on the next lesson on building your own keyframed animation.
What you need to know about keyframes:
- A keyframe tells us something is on the stage in a particular frame.
- You can only select objects in a keyframe.
- We can do things to objects in a keyframe without affecting other things in other keyframes.
- Creating a new keyframe creates an exact duplicate of everything on the stage in the previous keyframe.
As I say in the video, I’m all about hammering in the basics and I will be repeating these things in the lessons that follow. You’re only going to learn these things through repetition and hands-on work. I’m going to provide just that.